Team City organizational setup alternatives

The way we decided to manage the continuous integration process is to have one build server per project, that is an exclusive virtual machine with a Team City install running on it. These strategy gives each team full control over the server without having to worry about other projects.

Other alternative, that I think is more frequently used, is to have only one build server for the whole organization and several build agents. When using this strategy the build server concentrate the all build configurations, checkouts the code and delegate to an agent the execution of the build steps. If you have two projects with incompatible software requirements (i.e. one project running on Windows and other on Linux), then you could setup one Windows agent and Linux agent.

Last week I setup an environment following this second alternative. I took 2 machines, in the first one I installed a full TeamCity environment: server and agent, and in the second one I installed just an agent. It was very straight forward. One additional benefit of this setup is that it allows run builds in parallel.

Build Servers Initiative

A couple of weeks ago I started helping some teams to set up their continuous integration servers. There are several tools and strategies you can use to accomplish this task. In our case, we decided to use MSBuild as the automation tool and TeamCity as the continuous integration server. Team City provides several features to automate the build process, but we preferred to minimize the dependencies with Team City for 2 main reasons:
  • We want to be able to run the automated build process in the devs machines.
  • We want to be able to use another build server.
For us, the standard build process includes:
  • Running source analysis (StyleCop)
  • Running code analysis (FxCop)
  • Compiling (CS compiler)
  • Running tests (MSTest)
  • Running coverage (VS build-it coverage feature)
MSBuild only provides built-in support to compile, so for the rest of these tasks we had to do some research. A couple of weeks ago Gabi Iglesias posted about some of the spikes we did.
After research and spiking, this is the approach we finally took:
  • To run StyleCop and FxCop we are using MSBuild Extension Pack, an open source project published at CodePlex
  • To run MSTest and coverage we are using home made MSBuild tasks developed by our Engineering Excellence team (these tasks were developed back in 2008, so for our new initiative we had to update them)
In upcoming posts we will provide more details on this topic.

Herramientas de oficina en la nube

Un de los utilitarios que aún no logré encontrar a gusto en Ubuntu es un editor de diagramas. He probado varios (Dia incluido) pero por una u otra cosa, ninguno me vino bien. Por eso celebré cuando encontré Gliffy, una aplicación web para hacer diagramas. Simplemente excelente, soporta casi todos los mismos diagramas que Visio (organigrama, red, uml, flujos, etc.).

Al igual que Prezzi, es una aplicación Flash (por si no lo conocen, Prezi es una herramienta para realizar presentaciones, funcionalmente es un competidor/reemplazo de PowePoint, pero tiene un enfoque diferente, muy recomendado).

Un detalle no menor de Gliffy es que no es gratuito, ofrece un trail gratuito por 30 dias (que es lo que estoy usando actualmente) y luego tiene un costo de alrededor de 5 dólares mensuales por cuenta.

Ubuntu update

Técnicamente no es updated, sino que simplemente decidí reemplazar mi ubuntu de 64 bits por uno de 32 bits debido a que no estaba contento con el rendimiento de mi máquina. Entonces me bajé el ISO correspondiente a 11.04, lo «quemé» en un pendrive y pisé mi antigua instalación. Luego de haber completado todo el setup, noto una leve mejora en el desempeño de mi máquina, pero nada demasiado relevante.

Les paso a contar ahora las yerbas complementarias que instalé una vez finalizada la instalación del sistema base.

Primero actualicé los repositorios utilizados por apt-get

sudo apt-get update

Lo primero a instalar es Gnome-Do una aplicación que permite lanzar la ejecución de un programa tipeando su nombre en un ventana de dialogo.

sudo apt-get install gnome-do

Continuando con los fundamentales, el siguientes paso fue instalar una extension del  explorador Nautilus para tener un menú contextual para abrir una teminal.

sudo apt-get install nautilus-open-terminal

A mi me gustan la fuentes de Microsoft, entonces:

sudo apt-get install msttcorefonts

Un utilitario infaltable es el Gimp:

sudo apt-get install gimp 

El siguiente paso es instalar Chrome, para lo cual seguí el procedimiento sugerido por Google.

Momento de instalar algunos utilitarios que funcionan como add-ons de Firefox: FireBug y FireFTP.

Llega la hora de las herramientas de desarrollo. Comenzado por Java aparece la diyuntiva de si instalar la version OpenJDK o la de Oracle. En teoría ambas siguen la misma especificación, pero la realidad es que hay reportadas menores diferencias. La buena noticia es que ambas versiones pueden convivir. Por una cuestión de simplicidad instalé OpenJDK que se instala fácilmente via apt-get

sudo apt-get install openjdk-6-jdk

Luego bajé un Eclipse classic de la página de Eclipse.

El siguiente items es el entorno Ruby, para cuya instalación me baso en el post que escribí hace un par de semanas.

Para Pharo, bajé el Zip correspondiente con la última versión de la máquina virtual y restauré mi imagen favorita desde mi pendrive.

Bien, estoy es todo para comenzar a trabajar.

Jenkins vía GTalk

Con mi llegada al mundo Ruby comencé a utilizar Jenkins como servidor de integración contínua y cuando empecé a investigar los plugins me copé. Los últimos dos que agregué fueron el HTML Publisher y el Jabber Notifier.

El HTML Publisher permite visualizar en la interface de Jenkins reportes html que se generen como parte del proceso de build; en mi caso lo uso para visualizar el reporte generado por SimpleCov. La configuracion es trivial, solo hay que indicar la ubicación y nombre del archivo del reporte.

El Jabber notifier permite enviar notificaciones vía  GTalk. Una vez instalado el plugin (que se instala con 2 clicks al igual que casi todos los plugins Jenkins) la configuración es bastante simple. En primer lugar vamos a necesitar una cuenta de gmail para que sea utilizada por Jenkins, en mi caso tengo una cuenta de gmail generada especificamente para este propósito.  Entonces en la configuración general de Jenkins (Manage Jenkins > System Configuration) en la sección Jabber Notification ponemos las siguientes settings:

  • Jabber ID: <la cuenta de gmail que queremos que Jenkings use para enviar las notificaciones> (ojo, esto no es la cuenta a la que Jenkins va a enviar las notificaciones, sino la cuenta con la que Jenkins se va logguear en GTalk)
  • Password, el password correspondiente a la cuenta de Gmail antes mencionada
  • Server: talk.google.com
  • Expose presence: yes
  • Acceptance mode for subscription requests: accept_all
  • Bot command prefix: !

Y el resto de los campos podemos dejarlos en blanco. Luego en la configuración particular de cada Job, en la sección Post-build actions, habilitamos  Jabber Notification y en el campo targets indicamos las cuentas de Gtalk a la que se debe notificar.

Les dejo un screenshot de las notificaciones que envia el Jenkins, noten lo gracioso del mensaje de estado.

Jekyll Quickstart

Some days ago Johnny posted about Jekyll and that motivated us (Martin and me) to perform some spikes with it. So in this post I will share what I have been doing. I assume that you have already set up your Ruby environment.

Let’s start by installing jekyll:


$> sudo gem install jekyll

Very easy and straightforward.

Now create a directory for your site and create the following files/folders in it (this structure is basically what Jekyll’s documentation suggests):

  • _config.yml, this file stores the configuration data that is used by Jekyll. Most of this information can assume default values or the values can be specified as command line arguments when invoking Jekyll. I suggest specifying the destination argument, which specifies where output files will be placed.
  • index.html, this will be the landing page of your site, but in order  for this file to be processed by jekyll we need to add the following line at the top of the file. This will indicate to jekyll which layout to use in order to render the page as well as its title.

---
layout: default
title: jekyll-spike
---
  • _layout, as you may imagine this folder will contain the files that define the layout of your pages (in .net we would say the «master pages»)
  • _post, this folder is where you will place the markdown files with your posts

That is pretty much all; now you can add the classic folders for static resources like images, css, etc.

Now to generate your website, just open a terminal in the root directory of your application and call jekyll

$> jekyll

This will create a whole static site under the folder you specified as the destination in the _config.yml file. Now, every time you want to add a new post/page, just create a markdown file under the _posts folder and then execute jekyll to regenerate the site.ust ese

There is also an option in jekyll to generate the site and start a webserver to host the site all at once, just execute

$> jekyll --server

Well this is all for now. If you want, you can download a zip file with this basic structure from here.

Getting started with Ruby on Windows

The life takes us through different and mysterious ways. In this occasion that way has lead me to Ruby world.

So, here are the steps I perform to get my Ruby development environment up and running on Windows 7.

I started by downloading Ruby from http://rubyinstaller.org/. In my case and because of the context of my project I choose Ruby 1.8.7.

image

The installation was very straightforward: accept the license, ensure to check the “Add Ruby executables to your PATH” option and press install.

image

After a couple a seconds the following screen displayed telling that the installation was completed.

image

The next component to install was the DevKit, a set of tools to allow the usage of C-native features in Ruby. The installation of this component was not so straighforward, I had to follow the instructions detailed here: https://github.com/oneclick/rubyinstaller/wiki/Development-Kit.

With this, we can say that the base infrastructure is ready, but it is not enough to develop applications. We will need to install gems (this is name given to Ruby packages). To install gems we can use RubyGems package manager that comes with Ruby installation. To use it, just open a Commmand Prompt and type the command to execute. In my case case I installed some tools that I already new I wanted to use:

  • Sinatra: a DSL tools to create web applications
  • Data Mapper: a persistence framework
  • Bundler: a tool to manage application dependencies
  • Heroku gem: a package to interact with Heroku platform

To install all this gems, just execute the following script:

gem install sinatra
gem install data-mapper
gem install bundler
gem install heroku

If while installing any of these gems you get an error telling “invalid date format in specification”, you will have to go to follow these steps:

  1. Go to <ruby folder>librubygems1.8specifications.
  2. Find the file mentioned in the error and open it.
  3. Look for a line assigning a date, something like s.date = %q{2011-08-17 00:00:00.000000000Z}
  4. Modify that line and remove the time s.date = %q{2011-08-17}
  5. Save the file and you are ready.

Well folks, that’s all, you are almost ready to start working. I say almost because you may want to install an IDE. But that will be the topic of another post.

To be continue….

MMP Video Editor (RCE): adding configuration parameters

If you want to extend RCE by adding a new module, it is possible taht you need to add some configuration parameters for the module’s logic. Depending of the nature of your module, you will set the configuration parameter when deploying the application in your server or using another approach you could allow the user to modify this configuration parameters in the application UI.

To analyze these two situations let’s suppose we need to implement an alerts module to check for alerts provided by a remote service. This new module depends on a integer parameter that sets the interval the alert service will be checked. This parameter cannot be modified by the user. What the user can decide is to enable or disable the alerts module while running the application.

So, we will create a new module following RCE architecture (that is based on Prism) and we will add our new module to the ModuleCatalag in the shell project.

To manage the interval parameter, we will add a new entry in the Settings.xml file in the RCE.Web project.

<Parameter Name="AlertsInterval" Value="10000"/>

Then, to access this parameter, we can use the IConfigurationService provided by the RCE.Infrastructure assembly. We just have to declare this interface to be injected by the container into our instance.

public AlertsPresenter(IEventAggregator eventAggregator, IAlertsView view, IAlertService alertService, IConfigurationService configurationService)
{
   int interval = configurationService.GetParameterValueAsInt("AlertsInterval").GetValueOrDefault(1000);
   // perform additional initialization logic here
}

Note that GetParameterValueAsInt is an extension method and to be able to use it, you have to add a using statement for RCE.Infrastructure.

To manage the other parameter that can be modified by the user to enable/disable the module, we should use the settings module, just to be consistent with the application. As it is provided, the settings module was not designed in a extensible way, I mean, if we need to manage a new parameter in the settings view, we have to modify the settings module each time we want to add something new. We could modify the settings module to handle our specific parameters, but instead of that we will modify the settings module to make it more flexible and avoid future modifications.

We will start by adding a new Region inside the Settings view, to allow each new module to add its own settings view. To do this, we have to include the following declaration at the beginning of the file SettingsView.xaml file.

<UserControl xmlns:input="clr-namespace:System.Windows.Controls;assembly=System.Windows.Controls.Input.Toolkit"&nbsp; x:Class="RCE.Modules.Settings.SettingsView" xmlns=<a href="http://schemas.microsoft.com/winfx/2006/xaml/presentation">http://schemas.microsoft.com/winfx/2006/xaml/presentation</a> xmlns:x="http://schemas.microsoft.com/winfx/2006/xaml"&nbsp; xmlns:d="http://schemas.microsoft.com/expression/blend/2008"&nbsp; xmlns:mc=<a href="http://schemas.openxmlformats.org/markup-compatibility/2006">http://schemas.openxmlformats.org/markup-compatibility/2006</a>&nbsp; xmlns:Regions="clr-namespace:Microsoft.Practices.Composite.Presentation.Regions;assembly=Microsoft.Practices.Composite.Presentation" mc:Ignorable="d" xmlns:Commands="clr-namespace:Microsoft.Practices.Composite.Presentation.Commands;assembly=Microsoft.Practices.Composite.Presentation" xmlns:Interactivity="clr-namespace:System.Windows.Interactivity;assembly=System.Windows.Interactivity" <br>xmlns:Behaviors="clr-namespace:RCE.Modules.Settings.Behaviors" BorderThickness="0" d:DesignHeight="926">

Then, we need to add a new row to the container Grid

<RowDefinition Height="80"/>

Finally, we add the new region in the new row at the end of the file.

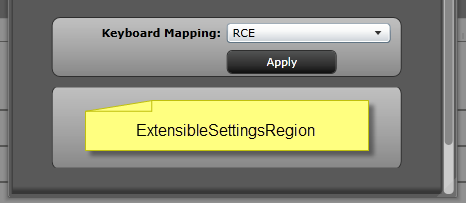
 <Border Grid.Column="0" Grid.Row="14" Background="{StaticResource ComboBrush}" CornerRadius="8,8,8,8" Grid.ColumnSpan="2" HorizontalAlignment="Center" Width="350" VerticalAlignment="Center" Height="85" Style="{StaticResource SharedBorderStyle}">
  <ItemsControl Regions:RegionManager.RegionName="ExtendedSettingsRegion" /></Border>

Now, we need to add the ExtendedSettingsRegion region to the RegionNames class in the RCE.Infrastructure project.

public const string ExtendedSettingsRegion = "ExtendedSettingsRegion";

At this point, if we run the application, we will see the following Settings view.

 image

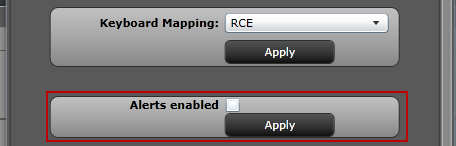
Now, each new module should define a view to be loaded in the ExtendedSettingsRegion (of course it is not mandatory, it is just in case the module requires to manage settings). In the case of our AlertsModule we have just 3 visual controls, a textblock, a check box and a button.

<UserControl x:Class="RCE.Modules.SWUAlerts.Views.AlertsSettingsView" xmlns=<a href="http://schemas.microsoft.com/winfx/2006/xaml/presentation">http://schemas.microsoft.com/winfx/2006/xaml/presentation</a> xmlns:x=<a href="http://schemas.microsoft.com/winfx/2006/xaml">http://schemas.microsoft.com/winfx/2006/xaml</a> xmlns:d="http://schemas.microsoft.com/expression/blend/2008"&nbsp;&nbsp;&nbsp;&nbsp; xmlns:mc="http://schemas.openxmlformats.org/markup-compatibility/2006"&nbsp;&nbsp;&nbsp;&nbsp; xmlns:Commands="clr-namespace:Microsoft.Practices.Composite.Presentation.Commands;assembly=Microsoft.Practices.Composite.Presentation"&nbsp;&nbsp;&nbsp;&nbsp;&nbsp; mc:Ignorable="d"&gt;&nbsp;&nbsp;&nbsp;&nbsp; &lt;Grid&gt;&nbsp;&nbsp;&nbsp;&nbsp;&nbsp;&nbsp;&nbsp;&nbsp; &lt;Grid.ColumnDefinitions&gt;&nbsp;&nbsp;&nbsp;&nbsp;&nbsp;&nbsp;&nbsp;&nbsp;&nbsp;&nbsp;&nbsp;&nbsp; &lt;ColumnDefinition Width="0.5*"/&gt;&nbsp;&nbsp;&nbsp;&nbsp;&nbsp;&nbsp;&nbsp;&nbsp;&nbsp;&nbsp;&nbsp;&nbsp; &lt;ColumnDefinition Width="0.5*"/&gt;&nbsp;&nbsp;&nbsp;&nbsp;&nbsp;&nbsp;&nbsp;&nbsp; &lt;/Grid.ColumnDefinitions&gt;&nbsp;&nbsp;&nbsp;&nbsp;&nbsp;&nbsp;&nbsp;&nbsp; &lt;Grid.RowDefinitions&gt;&nbsp;&nbsp;&nbsp;&nbsp;&nbsp;&nbsp;&nbsp;&nbsp;&nbsp;&nbsp;&nbsp;&nbsp; &lt;RowDefinition Height="0.5*"/&gt;&nbsp;&nbsp;&nbsp;&nbsp;&nbsp;&nbsp;&nbsp;&nbsp;&nbsp;&nbsp;&nbsp;&nbsp; &lt;RowDefinition Height="0.5*"/&gt;&nbsp;&nbsp;&nbsp;&nbsp;&nbsp;&nbsp;&nbsp;&nbsp; &lt;/Grid.RowDefinitions&gt;&nbsp;&nbsp;&nbsp;&nbsp;&nbsp;&nbsp;&nbsp;&nbsp;&nbsp;&nbsp;&nbsp;&nbsp;&nbsp;&nbsp;&nbsp;&nbsp;&nbsp; &lt;TextBlock Grid.Column="0" Grid.Row="0" Text="Alerts enabled" FontWeight="Bold" FontSize="11" Foreground="{StaticResource ForegroundBrush}" VerticalAlignment="Center" HorizontalAlignment="Right" Margin="0,0,5,0"/&gt;&nbsp;&nbsp;&nbsp;&nbsp;&nbsp;&nbsp;&nbsp;&nbsp; &lt;CheckBox x:Name="AlertsEnabled" Grid.Column="1" Grid.Row="0" IsChecked="{Binding Path=AlertsEnabled, Mode=TwoWay, ValidatesOnExceptions=True, NotifyOnValidationError=True}" VerticalAlignment="Center" />
<Button Grid.Column="1"&nbsp; Grid.Row="1" Content="Apply" Commands:Click.Command="{Binding ApplyAlertsSettignsCommand}" VerticalAlignment="Center" Width="110" Margin="0,0,10,0" Cursor="Hand" HorizontalAlignment="Left" Foreground="{StaticResource ForegroundBrushAlternative}" Background="{StaticResource ToolBarBrush}" Template="{StaticResource SetttingsButtonTemplate}"/></Grid>
</UserControl>;

image

The other extension point to consider is the persistence of the parameter. The settings module manages the persistence using the configuration service, so we can use it and it will be almost the same we did for the static parameter. We just have to declare the dependency to be injected in the constructor and adding a new entry in the settings file.

public AlertsSettingsPresenter(IAlertsSettingsView view, IConfigurationService configurationService){..}


<Parameter Name="AlertsEnabled" Value="True"/>

And use it when handling the apply event.

public void ApplySettings(object parameter)
{
var valuesToUpdate = new Dictionary<string, string>();
valuesToUpdate.Add("AlertsEnabled", this.AlertsEnabled.ToString
this.configurationService.UpdateParameters(valuesToUpdate);
}

If our module needs to updated itself when a configuration value changes, we could subscribe to the ConfigurationChanged event of the configurationService.

That’s all folks! Let’s do a recap:

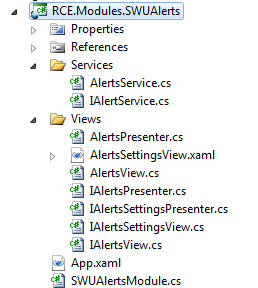
  • We modified the settings Module to include a new Region (ExtendedSettingsRegion)
  • We created a Settings view in our module (AlertsSettingsView)
  • We added the the corresponding presenter (AlertsSettingPresenter) to able the update of the parameters

Below is a screenshot of the final project of my module.

image 

TODOs:

The way this solution is implemented requires each module to handle the persistence, I mean, each module has to provide a “save” button and call the configuration service. I think that applying a refactoring this logic could be handled by the settings module, but that is part of another post.

De Paint.net a Paint.mono

Aunque a mi amigo Marcio le cueste creerlo, desde mi viaje a Francia que estoy con Ubuntu como mi sistema operativo principal. Esto se debe a que he logrado encontrar prácticamente software para cubrir todas mis necesidades. Una de las pocas cosas que me faltaba resolver era un editor gráfico, ya que si bien en linux está disponible el famoso Gimp, nunca me resulto cómodo. Puede que sea por el modelo de ventanas que tiene o porque me cuesta encontrar algunas funcionalidades. En Windows, yo suelo utilizar el fantástico Paint.Net. Yo sabia que si bien el Paint.Net estaba construido con tecnologia .NET hacia un uso importante de WindowsForms y ello fue lo que me llevo a pensar que no funcionaria en Windows, lo cual comprobé que era efectivamente asi, pues en la página de Paint.Net se indica explicitamente que es un editor para Windows. A pesar de esto se me dio por googlear «paint.net linux» y para mi sorpresa me encontré con Paint.mono un port the Paint.Net a Mono. Luego de investigar un poco, logro instalarlo exitosamente en mi sistema ejecutando los siguientes tres comando de una terminal:

sudo add-apt-repository ppa:xmlich02/ppa
sudo apt-get update
sudo apt-get install paint-mono

El único detalle de esta forma de instalación es que no agrega una entrada de menu correspondiente a Paint.mono. Para ejercutarlo hay que presionar ALT+F2 y luego tipear paintdotnet.

Proyecto Seed (primera parte)

Finalmente después de un mes de trabajo voy a intentar explicar sintéticamente en que consiste el proyecto en el qué me encuentro trabajando. Pero dado que para entender lo que estamos intentando hacer es necesario cierto conocimiento de Smalltalk, he decidido dividir esta explicación en 2 partes. En esta primera parte voy a explicar algunas cosas básicas (o mejor dicho históricas) de Smalltalk. En la segunda parte voy a ahondar en la problemática de nuestro proyecto y en  los distintos enfoques que analizamos.

Smalltalk a diferencia de la mayoría de los lenguajes actuales, ofrece un desarrollo basado en una imagen. Esto es: al programar uno no manipula archivos de texto con código fuente, sino que el código es manipulado en el contexto de una imagen de memoria que contiene toda la definición del sistema, o sea sus clases y sus correspondientes instancias. Esta imagen es ejecutada por una máquina virtual, y en este punto sí es como Java, C# y algunos otros lenguajes actuales.

Si bien existen distintas implementaciones de Smalltalk (Gnu Smalltalk, VisualWorks, Squeak, Dolphin, Pharo, etc), todas ellas están basadas en la especificación del Blue Book, publicado a comienzo de los años ’80.

Todo sistema Smalltalk consta de dos componentes, una máquina virtual y una imagen. Una máquina virtual puede interpretar un formato específico de imagen. En el caso particular de Pharo, el formato de imagen es compatible con el formato de Squeak, porque en cierto modo Pharo surge inicialmente como un «branch» de Squeak.

La evolución de Smalltalk y en particular de Squeak/Pharo a lo largo de más de 20 años ha consistido en modificaciones «relativamente menores» en la máquina virtual y en la imagen. Y quiero que nos detengamos en algo, la imagen de Squeak se generó UNA vez, hace unos cuantos años escribiendo byte a byte según lo que esperaba la máquina virtual, de ahí en más la evolución ha consistido en modificaciones de esa primera imagen a partir de agregar/quitar/modificar clases, métodos e instancias. Si tenemos en cuenta que la imagen original data de una época en que la orientación a objetos recién daba sus primeros pasos, no es raro que al examinar el kernel de la imagen (clases Behavior, Class, Object, etc) nos encontremos con algunas cosas sospechosas desde el punto de vista de la orientación a objetos y la separación de incumbencias (dependencias poco felices, muuuuchos métodos dentro de una misma clase, métodos deprecados, etc, etc ).

Hasta aquí los conceptos, en la segunda parte entraré en cuestiones concretas del proyecto.